
Aren't kid hand prints the cutest!?
As a mom, I know that they melt my heart. Actually, they've always melted my heart - as a teacher, an aunt, a friend and a mom.
Every year I like to do several Christmas crafts with my kids at home. I love to craft and be creative. This year I tried extra hard to come up with Christmas arts and crafts because both kids have been home since Thanksgiving doing school at home. That means no art, no Christmas programs and no Christmas fun and games with their friends. Boo!
I think I found my very favorite Christmas craft ever!
We made Santa hand print ornaments this year and they turned out are darling.
I had seen some hand print Santa ideas on pinterest, but they all involved clay. That makes a really heavy, fragile ornament that is difficult to hang plus it's complicated to work with.
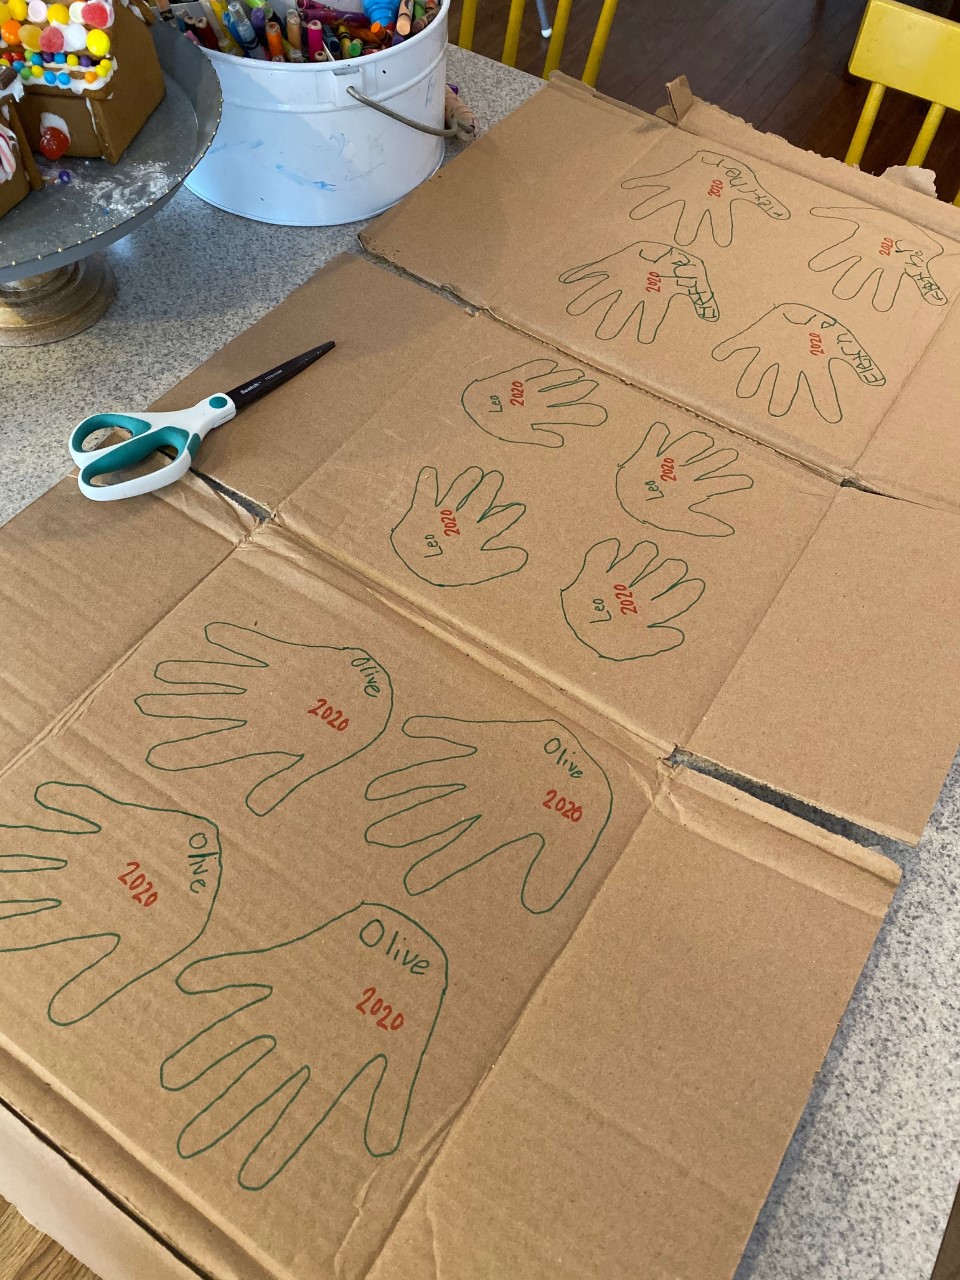
I decided to try to make Santa hand prints out of cardboard.
If your house is like mine, you've got an abundance of delivery boxes this time of year. I've also felt a tug to use up the supplies I already own instead of going out and purchasing everything new when I get the urge to do a project. This project cost me $0 because I already had the items in my craft closet.

Supplies:
one cardboard box flattened and labels removed
skinny marker
red, white, black paint
sparkly pom poms
glue gun
twine
scissors
Directions:
1. Trace kid hand prints on cardboard. Be sure to leave room to cut around them. I traced 4 per child. Two for us and two to giveaway to grandmas. I traced each hand print to ensure that they were really accurate. Then I had each kid write their name inside their hands. I added the date.

2. Cut out kid hand prints with a quality pair of scissors. It took me about 30 minutes to cut out 12 hand prints. It takes a little muscle to cut through cardboard. However, it's totally doable with regular scissors.


3. Time to paint! Your Santa faces will turn out best if you give each layer time to fully dry. That will allow for the colors to remain bold and not mix. I gave each big kid a paper plate to paint on and then I painted Leo's. Paint the Santa beard first, add a fluffy brim for his hat and a bit of fluff on the thumb for the pom pom on his hat. Let this dry.

4. Come in with the red paint to finish his hat. Once that is dry add some white paint on top to make the brim of his hat look authentic and furry.
5. Time for Santa's face. Paint a pinkish face, dot on eyes and a nose and then paint on his mustache. We liked the layered look. I didn't take many pictures during these steps because it was all hands on deck! We went slow, took our time and took turns to ensure we painted really cute Santas. Think of it as a step by step art class.

6. Once all of the paint is dry, cut twine the length you need and hot glue it into the back of the hand print. Two dots of glue seemed to hold on the twine really securely. Let them dry completely, flip over and glue on a pom pom if you want to.

Ta da! I love these Santas! They look great with hand prints of all sizes - baby to big kid!

The cardboard worked perfectly! It was sturdy, held up wonderfully with paint and hot glue and the Santas look so cute on our Christmas tree. They really make a statement.


Do you have any cute little hands that would enjoy making these? It would be the perfect thing to do over Christmas break to capture their tiny little hands exactly as they were for Christmas 2020.
Let me know if you have any questions! Or tag me @polkadottyplace if you share them on IG.
Those are really cute!! I love crafts that are so easy to make with simple supplies! Well done, mama!
ReplyDeleteSuch a cute ornament! MERRY CHRISTMAS!
ReplyDelete