Showing posts with label party. Show all posts

Monday, August 28, 2023

How to DIY Gorgeous Flowers for a Dinner Party

We had a really fun dinner party at our house on Saturday night.  It was a mix of Kevin's work colleagues and other local psychologists.  I knew some of them and then made several new friends.  We had the best time.  Kevin grilled and everyone brought side dishes to share.

We were celebrating/welcoming two new people to the group.  I made two gorgeous centerpieces and used them as decor + their welcome gift.  Both ladies were absolutely thrilled to take home a beautiful bouquet at the end of the night.

 I got several compliments on the flowers and they couldn't have been easier.  I'll share my secrets for putting together really affordable, beautiful flowers!

1. Head to Sams and pick up one of their premium bouquets.  They're around $14.99 and are filled with the prettiest variety of flowers, berries and greenery.

2. Pick out one more coordinating bouquet to add into the premium bouquet.  I went with dark pink Alstroemeria for $7.99.

3. Go to your local thrift shop and pick up two of the same or very similar vases.  I love a square vase so I grabbed two very similar square vases for $4 total.  They were each marked $4 and everything was half off.  That way I could gift the bouquets and the vase since both were so affordable.

4. Trim down the flowers and start arranging them.  Cut some tall, some medium and a few short.  Split up the flowers so there are equal numbers of stems in each vase.

5. If you have something in your yard to cut and add into your bouquet - do it!  I love this bright green asparagus fern.  It add some great color and texture.  I probably added 4 or 5 stems into each bouquet.

6. Add fresh water and change daily.  I never use the flower food packets they come with - just change the water often and it'll be fine.


Both ladies were so excited when I told them to pick a vase of flowers to take home!  

It really was the perfect welcome gift to surprise them with at our dinner party.

I loved the variety of flowers and greenery so much.


I was really excited about this bouquet because it coordinated so well with my table decor.  I picked up these butterfly napkins and wrapping paper for the table at HomeGoods.  They were bright and colorful and seemed really welcoming.

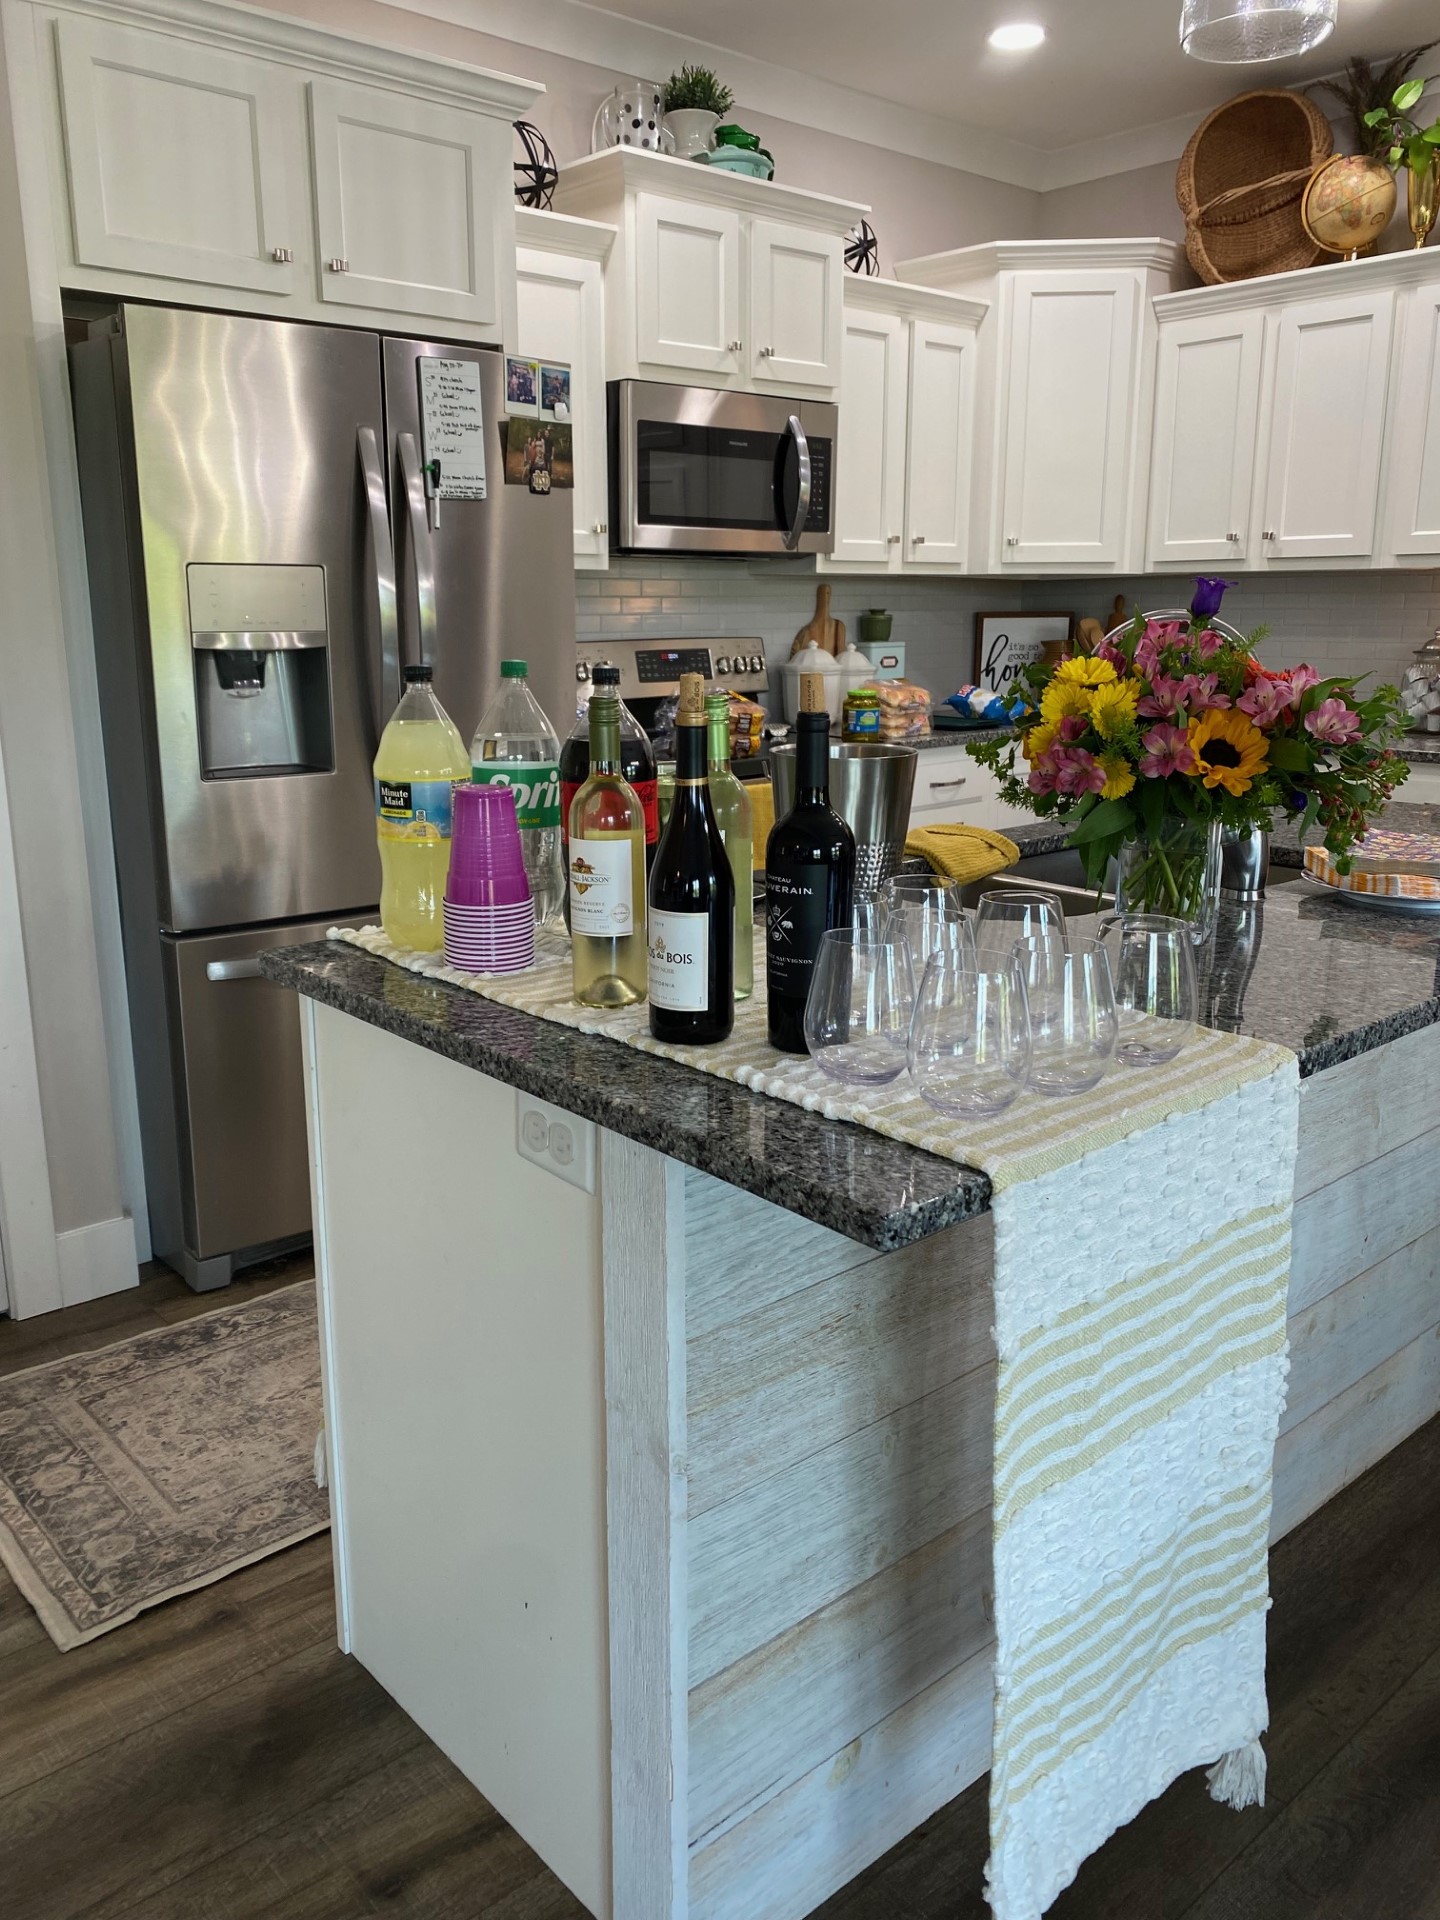
The drink station got one bouquet.

And the other bouquet went on the table.  It was low enough that everyone could see around it and it added some really pretty color to the table.


So for $27 I got two big bouquets for our dinner party!  Success!

You've got to give this a try the next time you need flowers for an event!

Wednesday, June 1, 2022

Balloon Garland Tips & Tricks

I've been raving about balloon garlands for over a year so I figured it was time to do a little behind the scenes post about them.  I'll share my tips, what works best for me and #8 is the very hardest thing about balloon arches.  I included a link to the best thing you can buy if you're planning to do a balloon garland.  It's the best air pump that I've found and it's on a big sale.  I've build several balloon arches and you learn a lot after doing that first one.  They are easy peasy - I promise!  They are such a fun addition to any party!


1. Always buy a kit

There are tons of options for under $15 on Amazon.  Seriously any color scheme or any theme balloons are available.  You get 100+ balloons with a big variety of colors and shapes.  People ask me if it's more affordable to build you own kits and I think you'd easily spend more than $15 trying to buy all the balloons and the balloon tape.  I've seen several stores have kids in store, but they all seem small and pricey so I'd recommend looking on Amazon first.


2. Watch some Youtube tutorials.

There are tons of them.  I've watched several different ones that are quick and super informative.  They'll help you to feel confident in building your balloon arch in no time.


3. Buy a pump that has two air spouts.

I somehow lost a balloon pump in the move so I upgraded my pump to one with two air spouts.  It allows both kids to be blowing up balloons at the same time and really speeds up the process.  Blow up all of your balloons before you start building your garland.  That'll give you a good idea of what you have to work with before you start.


4. Ask for help.

My big kids are great at helping me blow up the balloons.  They can't tie them on their own so I do all the tie work.  Then when it comes time to build them they hand me the colors I need.  If you can avoid blowing up balloons with little kids around, that will make your life easier.  The air pump is loud and scares my toddler so we always do this work at nap time or after he goes to bed.


5. Don't wait until the last minute.

Blow up your balloons at least 24 hours before your event.  That will give you plenty of time to build and hang your balloon garland.


6. Transporting is hard.

I've transported my balloons before and it's hard.  Even in my van with the seats down, they take up so much room.  If you can avoid having to transport your garland do that.  It's not impossible, but make sure you have tons of inside vehicle room if you plan to transport your garland. 


7. Try to place it in a spot where you can take pictures with it

A balloon garland makes the prettiest photo op spot.  Your garland will last for weeks if you want it to so be sure to put it in a fun spot.  A classroom balloon garland would be such a fun way to kick off a school year.


8. Have a plan for hanging it

The very hardest part of decorating with a balloon garland is hanging it.  They are tricky to hang.  I hit the kitchen jackpot at our house because the way that our cabinets are arranged allows for me to have the perfect spot to wedge a balloon garland in.  I use packing tape to hang the smaller balloon garlands on my mantle.  If you leave a tail of balloon tape at the beginning and end of your garland, you will have a much easier time hanging it from there.  You can attach it with string, nail it up or use some strong tape to secure it.  I know people recommend using command hooks to hang it as well.  I haven't tried that method.  Just remember to give yourself plenty of time and several different hanging options to see what works best for your spot.


This is the air pump I was talking about!  It's great and on sale for just $21.99 right now!

Here's my Amazon affiliate link:


Balloon Garlands that I've loved:


Blow up all the balloons!!

This is the balloon tape up close.  See how there are holes all along it!?  You just have to put a balloon in each hole, twist it on and then alternate the way you put on the next one.  If you leave the first 4 or so holes empty, this will give you a really great tail to hang it from.  Trust me.

Do you have any balloon garland questions for me??

Tuesday, June 2, 2020

Easy DIY Donut Cake

Thank you for all of your kind words yesterday!  We really appreciate your love and concern for Fletcher and our family!

Let's pivot to something happy today... DONUTS!

I always let the kids pick their birthday treats and Olive requested sugar cookies and donuts.  Our local donut shop - Square Donuts - is her favorite.  I hopped in the car early on the morning of her birthday to get a dozen donuts on her actual birthday.  They're $9.09/dozen which makes for a very affordable birthday cake option.

She got the idea to stack them.  I had offered to form them into a #7 and put a candle in them, but she thought a stacked donut cake would be fun.  She was right.  It turned out great!

You just need a few things:
a dozen of your favorite donuts (a variety works well)
sprinkles
candle
*optional: a cake plate.


We learned a few things along the way:
1. Donuts are really best the day you buy them.  This cake needs to be made the same day you buy them.
2. Start your stack with the glazed donuts on the bottom and the icing donuts higher up.
3. Wait to stack them until about an 1-2 before the party so the donuts don't get too stuck together.
4. Sprinkle the whole cake with some sprinkles.


Donut cake success!

Would anyone in your family enjoy this cake?

Tuesday, May 26, 2020

LOL Party + My Party Hacks

Olive turns 7 this week and we've been looking forward to celebrating her all month long.  We opted to skip a friend party this year due to all the COVID-19 restrictions and just focus on doing small parties with our family.  She knew exactly what she wanted - an LOL doll themed party.  I picked up party supplies, made all of her favorite foods and we celebrated with family.  It was wonderful!

If you've been around here for very long, you know that I love throwing parties.  I look forward to celebrating all the things.  I wanted to put a different spin on my party post this year.  I thought I'd share some behind the scenes party hacks with you.  These are all things I've learned over the years that make party planning easier for me.

Watch for 10 of these *** throughout the post to read my party hacks.

Let's party!!  (I'll put links at the end of the post to anything I can.)

***Be sure to ask someone to snap pictures for you if you're busy trying to host.  I always ask my sister to take pictures during my parties because I know she'll get good shots and she'll tell me things like - turn the candle around the other way so that the 7 will be the right way for the camera.


***Pick three different patterns/colors for your napkins.  It'll add interest and fun layers to your table.
***Pick one item to inspire your party colors.  I picked the LOL doll tablecloth from Wal-Mart and selected colors, patterns and designs to go with it.
***Shop around to find an eclectic mix of party supplies instead of buying every item in a set.  I got the napkins from Walmart and Meijer.  Straws from Kroger and Dollar Tree.  LOL doll cupcake pics from Amazon, plates from Meijer and tablecloth from Walmart.  Mix and match!

Olive opted out of the traditional birthday cupcake and requested sugar cookies instead.  I made those, chocolate dipped Oreos and added in a classic chocolate chip cookie since that's always a crowd pleaser.  People seem to enjoy a little dessert buffet.

***Plan the menu around the birthday girl's favorite foods.  Oreos are life!

*** Melt 3 squares of white chocolate almond bark in the microwave until smooth.  Dip half of Oreo in almond bark.  Lay it on wax paper to dry and add sprinkles immediately.  Let dry for a couple of hours.  The kids loved these and they were so easy!

*** Fresh flowers seem to be in short supply at my local grocery stores.  I only found tiny bouquets of $10 tulips.  It would have taken 3 or 4 bouquets to fill a vase.  I did not want to spend that kind of money on party flowers.  I opted to buy this $9.99 beautiful flowering plant instead.  It was huge and so pretty on the drink table.  Bonus: I will repot it and enjoy adding it to my indoor plant collection.

 Hearts, stars and #7 shaped sugar cookies for the birthday girl!

 Chocolate chip cookies.  I added rainbow sprinkles to go with the theme.

***Sundae sprinkles are perfect for any dessert.  They're bigger, brighter and cheaper than the sprinkles you find in the baking aisle.  These are found in the same section as the sundae toppings.  These rainbow sprinkles are from Meijer.


We tried something new for favors this year and it was so fun!

***We did a BUILD YOUR OWN FAVOR BAG STATION!
Olive has 9 cousins on my side of the family so we planned this for them.  We added all of her favorites plus things we thought the kids would love.
 

1. Hand decorated bags for all the  kids
2. LOL Pez dispensers
3. Pez refills
4. Airheads
5. 3 Musketeers
4. Pink Starburst
5. Lip gloss/chapstick
6. Silly straws
7. Reese's
8. Waterproof Vinyl Stickers

*** Let the birthday girl go through the line first.  Then shuffle the bags and call the kids up one at a time to load up their bags.  We talked through quantities - one Pez dispenser per person, a couple of candies per person, etc.  It worked really well and all the kids enjoyed picking out their own flavors and favors.


 The LOL doll table cloths were so cute!  I put one on the adult table, one on the island and did a plain pink one for the kid's table.

Here are my Amazon affiliate links:
Thanks so much for shopping my links and supporting Polka-Dotty Place!!


Thursday, February 20, 2020

Sprinkled with Love

Yesterday I shared all the details of our sweet baby sprinkle for Leo.  Today I'm going to share about all the sweet ladies who came to celebrate with us.

It took a little bit of thinking and convincing for me to have a baby sprinkle for baby #3 when my sister offered.  I felt super lucky to have had wonderful showers for both Olive and Fletcher and didn't want to have people feel obligated to come to another baby party.  But then I realized that ALL babies are special and ALL babies deserve to be celebrated with the people you love.  I'd 100% recommend celebrating an upcoming baby no matter if it's your first or your fourth. 

Plus, as you know, baby Leo was the sweetest surprise.

We had actually gotten rid of a lot of our baby gear and bulky baby items.  So we were very thankful for the thoughtful baby gear and gifts we received for our little man.  We kept all our baby furniture, lots of baby clothes and toys, but the play mats, bouncers, infant car seats, single stroller, etc.

Let me introduce you to some of my very favorite ladies...

My sister and this adorable lion print for Leo's nursery.  I'll do a separate post about nursery inspiration, but for now think greens, neutrals, plants and a few jungle creatures.

My Mom.

Leo's 2 Great Grandmas!!  Grandma & Nana.  Kevin's grandmas are the sweetest!  They're wonderful and we're so thankful that they could come.  They're the best at keeping up with our family, coming to all our parties, cheering us on and we're lucky to have them.


My MIL and SIL.

My Aunt Vera.

My Mom & her sisters.  Lots of aunts!

Kevin's mom and her sisters.


Olive was scoping out the presents.  She wanted to wear her favorite dress so we coordinated,

These cute girl cousins were the best helpers.  They took gifts as I opened them and are growing up to be such sweet girls.  They're excited to have a baby boy to snuggle.

There's lots of lion themed baby things out right now.  Loved this cute outfit!


Kevin's grandma has crocheted a blanket for each baby.  What a special tradition!


My SIL, sister & mom.

 My friend Jacque.

Kevin's sister Jen & my SIL Kristen.

Leo's middle name is my dad's name.  Leo Marvin :)


The boys showed up at the end to say hello :)
What a fun party!!  Our family felt so loved.